Quantcast
Channel: Rak's Kitchen
Viewing all 1220 articles
Browse latest View live

CHOCOLATE SANDWICH RECIPE (GRILLED CHOCOLATE SANDWICH)

$
0
0
grilled-chocolate-sandwich
I got this chocolate sandwich idea when I saw a post in CFG about a sandwich shop that serves numerous sandwiches at Chennai. When I went through the menu they have, it was really tempting. Some sandwiches had only an ingredient variation, still since it’s a restaurant, I think it’s ok to have those variations for the customer’s choice. Out of all the sandwiches, I loved the idea of Chocolate sandwich. It sounded really tempting and I am sure many of you already have started drooling Drooling.  Kids would surely love to have it.
It was my long time wish to have a griller / sandwich maker. I love golden lines that the griller lay over the breads. It look gorgeous. So I was finding a good time to buy it, coz, I already have a triangle sandwich maker(which is a second one while the first one got spoilt) and a spongebob toaster for my kid who is a Sponge bob fan (me as well). So I was thinking why to buy another one and kept postponing. But other day when we went to Courts Mega store, I saw a good deal for sandwich maker with 3 interchangeable plates – griller, waffle maker and a regular triangle one that I already had. There was a griller alone too, but Vj told me to buy a better one as there was no much price difference. So I happily bought that one and immediately next day, I tried this grilled chocolate sandwich.Batting Eyelashes.
chocolate-sandwich-recipe

So what are you waiting for?  You can please your kid with their favorite fruits like banana, kiwi or strawberry and try this out for their breakfast or snack. They are sure gonna love it and say mom I love youLove Struck. Even you can have it, if you are a chocolate lover to quench your sudden chocolate cravings. With only 4 simple ingredients, you will sure hook to this. You can replace chocolate with nutella too.

Chocolate Sandwich recipe

Recipe Cuisine:Continental  |  Recipe Category:Breakfast
Prep Time: 5 mins    |  Cook time: 5 mins    Serves: 2

Ingredients


Bread slices 4 
Choco chips  1/2 cup (approx) 
Banana 1 
Butter  To grease 


Method

  1. Gather all the ingredients, slice the fruit thin. Prepare your sandwich maker as per the instructions given in your user manual. Heat it, grease with butter generously, place the bread, spread a layer of choco chips, arrange the fruit slices.
  2. 1-assemble
  3. Place another bread slice to cover it and close the lid. Toast for 3 minutes or as per your need.
  4. 2-grill

Notes

    • You can use nutella in place of choco chips, fruits can be of your choice.
    • Spread butter on the top and bottom for more crispy and even browning results.
    • Choco chips can be semi sweet, sweet or bitter sweet according to your taste preference.
    • Do not over load with choco chips because it may over flow while getting toasted.

Cut into triangles and serve with more fruits and a fruit juice or milk to go with it.

grilled-chocolate-sandwich-

Check our my other sandwich recipes here


ROSE MILK POPSICLE RECIPES | SUMMER SPECIAL RECIPES

$
0
0
rosemilk-popsicle
Who can forger about the triangle rose flavored/ coloured kuchi ice (rosemilk popsicle). It tastes and smells divinely! Where ever I go to restaurants, I either have badam milk or rose milk if I am thirsty. I just love it. So I wanted to try it out at home. I just made rosemilk and poured into the popsicle moulds and it turned out yummy! With summer coming up, I am sure you will be looking for something cold and even kids would love to have something cold. So you can try this simple and easy popsicles for yourself and your kids. We usually make Rasna popsicles, but this is the first time I am making this milky popsicle. Do try it out and make your family happy!
rose-milk-ice

Rose milk popsicles recipe

Recipe Cuisine:Indian  |  Recipe Category:Snack
Prep Time: 12H    |  Cook time: 20 mins    Serves: 4

Ingredients


Milk  4 cup (1 litre) 
Sugar 2 tblsp 
Rose syrup 3 tblsp (or as needed) 

Method

  1. I boiled milk and reduced it to 1/2 litre and filtered it. You can skip this step and just boil 2 cups of milk.
  2. 1-rosemilk
  3. Cool down and mix sugar, rose syrup and mix well.
  4. 2-rose-milk
  5. Pour it to the popsicle moulds and freeze it. (I wanted to use popsicle sticks instead of the one we get with the moulds. So I clicng wrapped and used a rubber band, pierce a slit with knife and inserted the popsicle sticks in it. You can use aluminium foil too and if you dont have moulds, just use any small tumbler.
  6. 3-tblsp
  7. Let it set for atleast 12 hrs and take it out, hold carefully under tap water (outer surface of the mould should be under tap water) and remove the popsicles.
  8. 4-rose

Notes

    • Adjust the rose syrup and sugar according to ur sweet preference. But make sure the rosemilk is bit sweeter than you drink.

Enjoy the flavorful, tasty popsicles on a hot day and loose yourself to a nostalgic flashback! Love Struck

rosemilk-ice

POORI, MIX VEG KURMA, POTATO MASALA - BREAKFAST MENU 5

$
0
0


This weekend breakfast is Aj’s favorite poori. He usually prefers kurma than the usual potato masala. Now a days he adjusts with potato masala too. But his preference is kurma. I make kutti (small) pooris when I make it for his lunch box, otherwise I make the regular sized pooris if at home. Here in Komalas, I have seen they have a kids menu as poori meals with small pooris, channa masala or mix veg kurma, potato masala and coke. I wanted to post this here too, so made today morning for breakfast.
I made aloo masala very less, and mix veg kurma as usual. Still I know it will be leftover, but I will use it for my dinner and potato masala for making masala dosa for Aj. I am writing this because some people think beyond and ask why you make so much, after this heavy breakfast what you had for lunch, what you will do with the left over, do you eat this much sorts of questions!!! Worried I know many of you pour your support by sending me appreciation mails for this series and thank you so much for those, but still one or two comments like above sure sounds discouraging!

Here is how I prepared this menu

Poori mix veg kurma & potato masala breakfast

Recipe Cuisine:Indian  |  Recipe Category:Breakfast
Prep Time: 12 hrs    |  Cook time: 45 mins    Serves: 4
  1. Cook potatos for masala. Mean while chop veggies for mix veg kurma.
  2. Chop onions and tomato for kurma, slice onion for masala. keep ready ginger, garlic (or ginger garlic paste) as needed.
  3. Keep other ingredients like chillies, coriander,curry leaves also ready. Grate coconut and gather ingredients to grind for kurma.
  4. First prepare kurma and while you cook (simmer) it,  prepare the potato masala.
  5. While both getting ready or is already ready, prepare dough for poori. Keep aside for 10 mins.
  6. Lastly when your family is ready, prepare poori and serve hot and fluffy puri s.
So simple yet exciting for kids – mini pooris with two different side dish is ready!


Check out the recipes
  1. Poori recipe
  2. Mixed vegetable kurma recipe
  3. Potato masala recipe
You can makepotato kurmaor cauliflower kurmaortomato kurma orchanna masala too instead of mix veg kurma.

Have a happy sunday! Love Struck

BUTTER CORN PASTA RECIPE | KIDS PASTA RECIPES

$
0
0
butter-corn-pasta-recipe
I saw this and got the idea at Changi ariport, in a restaurant menu. I didn’t go to that restaurant but just passed by where I saw this in their menu. I really wanted to try this way and was in my to try list for long time. Finally tried 2 weeks back and loved it. It so simple, sure a kid pleaser, a pasta recipe which is not tomato based or other pesto based, creamy, rich yet with less cheese. Kids would be all excited if you make this for them. Check out my otherpasta recipes here.
butter-corn-pasta-1

Butter corn pasta recipe

Recipe Cuisine:International  |  Recipe Category:Lunch/ Dinner
Prep Time: 5 mins    |  Cook time: 25 mins    Serves: 2

Ingredients


Spaghetti 100 gm (small bunch)
Butter1 tblsp
Any Cheese spread1 tblsp
Corn1/2 cup
Milk1/4 cup
Italian seasoningAs needed
Crushed black pepper powder1/4 tsp
Salt as needed


Method

  1. Boil enough water for cooking pasta and cook it with salt until tender (al dente). Drain and (Optional -wash with cold water) drizzle some olive oil to revent drying or save some water that we drained from pasta and sprinkle it to loosen it.
  2. 1-cook-pasta
  3. Cook corn keep aside. I used frozen corn, microwaved to cook it as per instructions given over the pack. Otherwise you can cook it in high for 3-4 minutes covered, with very little water. Heat butter in medium flame on a pan.
  4. 2-cook-corn
  5. Add the cooked corn and give it a mix. Add cooked pasta, cheese and continue mixing over medium heat.
  6. 3-stir-in
  7. Add milk, mix well, check for salt, add black pepper and any Italian seasoning.
  8. 4-cook

Serve hot. Juicy sweet corn works best for this.Or any tender corn will turn out well in this recipe.

butter-corn-pasta

Check out these spaghetti recipes too


BROCCOLI PARATHA RECIPE | INDIAN BROCCOLI RECIPES

$
0
0
broccoli-paratha       
I am not a big fan of broccoli, mainly its texture, so I always find a way to cook it in a way that its in mashed form like in my broccoli pesto pasta recipe. Aj is just opposite to me, he loves broccoli only if its in bite florets. This recipe is told to me by my friend Sangeeta and she asked me to try it. I loved the way it is prepared – with spice powders both in the stuffing and in the dough. I tried and I liked it a lot. This is sure a great recipe with broccoli for me to consume this healthy veggie. The preparation is exactly same as gobi paratha. I would say, I like this more than gobi parathaCool. Makes it a perfect one for your lunch box or your kid’s lunch box or for a quick fix dinner.

paratha-recipes

Broccoli Paratha recipe

Recipe Cuisine:Indian  |  Recipe Category:Lunch/ Dinner
Prep Time: 15 mins    |  Cook time: 15 mins    Serves: 2

Ingredients


Atta/ wheat flour 1 cup 
Red chilli powder 1 tsp 
Oil 1 tblsp + as needed 
Salt  As needed 

Stuffing

Broccoli, grated1 & 1/2 cup
Onion1
Finely chopped ginger2 tsp
Red chilli powder3/4  tsp
Garam masala powder1/2 tsp
Turmeric powderA pinch
Salt As needed
Oil2 tsp
Jeera1 tsp

Method

  1. Prepare dough with approx. 1/2 cup water (plus or minus as needed) using the first table ingredients. Keep aside while you prepare stuffing and make equal sized balls out of it at the time of rolling.
  2. 1-dough
  3. Wash and tap the excess water from broccoli. You can either grate or run it in a food processor. I used my mixie. Heat kadai and temper with jeera.
  4. 2-grate
  5. Add ginger and onion, fry till onion turns transparent. Add grated broccoli and mix for aminute.
  6. 3-fry
  7. Add turmeric, salt, red chilli and garam masala powder. Mix and cook covered for 2 minutes in medium flame.
  8. 4-cook
  9. Once done, transfer to a bowl. Spread the dough ball into thick circle as shown in the picture and stuff with 3 tblsp of the prepared broccoli.
  10. 5-stuffing
  11. Pinch the dough towards centre to close and make a pocket. Dust generously and start rolling our into thick parathas. Reverse the paratha while rolling in between and dust with flour if needed.
  12. 6-stuff
  13. Heat tawa until hot and cook the rolled out paratha both sides in medium flame. I usually drizzile oil only after the parathas are half done.  
  14. 8-tawa

Notes

    • I used juice/pulse option to give a grated feel for broccoli.
    • The dough should be in right soft consistency. Not sticky, not too stiff too. Otherwise the stuffing will ooze out.
    • I always keep the parathas in wire rack while cooling.

Serve with pickle and curd or any raita. I loved to have it as such. Soft parathas, stays soft for hours!

broccoli-paratha-recipe

RAVA DOSA WITH 5 SIDE DISHES - SOUTH INDIAN BREAKFAST IDEAS

$
0
0

This week, its rather a breakfast idea than a menu, but sure its special because of the side dishes. Vj doesn’t eat dosa at home except for maida dosa, but he eats plain dosa at the restaurant. When I ask why, he will say I get 4 different side dish here. So its all about the side dishes? Ok, well, I too can make it once in a while. So for a weekend we can make it special with all these side dishes right? I can give you suggestions how to make use of it the best too. I made sambar in such a way that I can use it for lunch too. So the spiciness and tanginess will be in between, not too tangy as lunch sambar and not too mild as the tiffin sambar. And chutneys, I have explained how in the steps. Go through the post for the tips. Here is how I prepared this breakfast.

South Indian breakfast Idea

Recipe Cuisine:Indian  |  Recipe Category:Breakfast
Prep Time: 30 mins    |  Cook time: 45mins    Serves: 3
  1. Pressure cook dal for sambar, mean while which grate coconut, chop onion, tomato for sambar and red chuney. Soak tamarind for sambar.
  2. Chop onion,ginger for rava dosa, gather coriander leaves for chutney.
  3. Gather all other ingredients like curry leaves,  coriander leaves, green chilli and all for the chutney, dosa and sambar.
  4. On to the stove work, roast for sambar powder, temper for chutneys – same for all three chutneys, so you can temper so that you can use it for all 3.
  5. Temper and fry for sambar, transfer for boiling and simmer it in another stove with veggies. Extract tamarind juice and add it to it. Sautee for green chutney and keep aside.
  6. Now grind first for sambar powder, keep aside. Grind red chutney and simmer it in the kadai.
  7. Grind all the coconut as we do for coconut chutney.  Take half for cococnut chutney and then add ingredients for green chutney and grind for it.
  8. Mix the tempered items to the chutneys ( you can temper lastly after grinding too).
  9. In between keep an eye on sambar and do the needed, prepare sambar.
  10. When everything ready, save the chutneys for dinner and keep remaining for breakfast. Make dosa once your family ready to eat.

Serve hot your family, rava dosa with 5 different side dishes – sambar, coconut chutney, coriander chutney, red chutney and idli podi.


Check out the recipes
  1. Rava dosa recipe
  2. Tiffin sambar recipe
  3. Coconut chutney recipe
  4. Coriander chutney recipe
  5. Red chuney recipe
  6. Idli podi recipe
    Check out other dosa recipes – masala dosa,cauliflower masala dosa, ragi dosaoats dosa, tomato dosa, wheat dosa.

CRISPY IDLI FRY (BAKED PODI IDLI) | LEFT OVER IDLI IDEAS

$
0
0
baked idli-fry
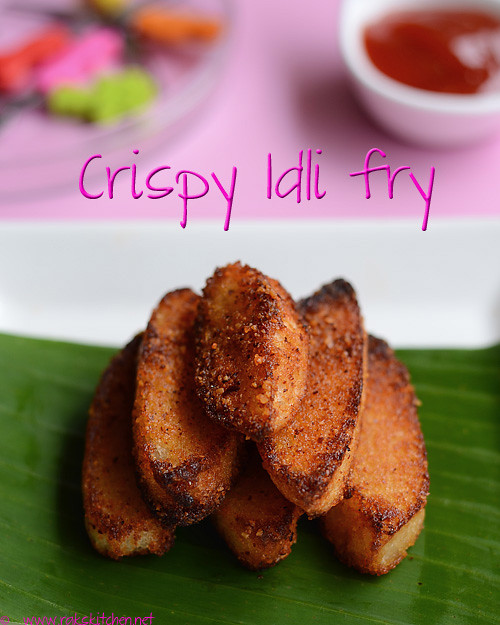
I have never ate idli fry with podi until last  month when I had these in a Birthday party I went. It was Aj’s classmate’s birthday and his mom had made most of the things herself in the party menu. I was totally dumb stuck seeing all those items prepared by herself. Though she as a helper with her, it needs lots of interest and passion towards cooking for a party. Among the starters, she had kept this podi idli fry and I first thought it was potato wedges, then later realised it is fried idli wedges tossed with idli podi. I decided the next instance to try at home and tried this baked version. It came out super crisp and its best way to use the leftover idlies for a change from the idli upma. Thank you Purnima for the idea Happy. You can do the same by deep frying too.
1-crispy-idli-fry

Crispy idli fry recipe

Recipe Cuisine:Indian  |  Recipe Category:Snack
Prep Time: 5 mins    |  Cook time: 20 mins    Serves: 3

Ingredients


Idli (leftover) 6 
Sesame oil 2 tblsp 
Idli podi  As needed 


Method

  1. Preheat oven to 190 oC. Cut the idlies into wedges as shown in the picture. Sprinkle and mix sesame oil generously to coat it evenly.1-cut
  2. Arrange it in a baking tray and bake it for 10 - 12 minutes. Take it out and turn over the idlies.bake,turn
  3. Bake again for 10-12 minutes or until golden in colour. Transfer to a bowl and toss it with idli podi as needed while it is hot. Sprinkle more sesame oil if needed.3-toss

Notes

  • Same can be done by deep frying the idli wedges too. It takes a while to get fried and oil too is absorbed more.

Serve hot with tomato chilli sauce or sauce of your choice. You can even make chutney to go well with this. It stays crisp even after cooled down.

idly-podi-fry

Check out this Kaima idli recipe too which is an excellent left over idli recipe idea.

KOOZH VADAM / KOOZH VATHAL RECIPE | SUMMER SPECIALS

$
0
0
koozh-vadam
Yes, I did it!!Big Grin In Singapore! I was planning to do a post on how to make koozh vadam/ vathal, javarisi vadam and vengaya vadam last year itself when I visit Chennai. My MIL does every year and passes to me. So I requested my MIL to wait until I visit Chennai so that I can learn from her, help her in making and also make a post. But she said she will finish making by the end of April itself and she did all by herself and passed it to me. Even my mom made vathals and gave it to me, so I had no chance to learn and make a post last yearStriaght Face.
koozh-vadam-fried
I know this year also everything gonna be the same. So I desperately wanted to learn and make vathals. So I asked my MIL how to do first koozh vadam. She told the recipe and method and as a bonus told another easy vadam also (which I will share next week, coz, its still kaanjufyingTongue). You all have no idea how happy and content after I finished making these vadamsHappy. Just like how I finished baking for the first time and the cake came out fully done. Same feeling, or may be even more happier than that, because I have never thought I can do this in my life as I thought it is very complicated. But then I realized its not like that, it just needs time and some physical work.
I agree if made in bulk like our moms and MILs, then its sure a project. But Since I made in small quantity, it was very easy. When it comes to making vadams I have lots of beautiful childhood memories related, yeah, as usualLoser. Every year mom makes koozh vadam (mom makes only koozh vadam and killu vadam/vengaya vadam mostly). Early morning before the sun rises, she will be ready with the koozh. We go to the mottai maadi and mom starts making and I used to help her by filling the press every time she finishes squeezing. My Bro ( +Sendhil ) also comes for helping. We will be thrilled to see the making, for no reasons. And while squeezing, we have laughed like anything non stopRolling on the floor. Wondering why? When we squeeze the vadam through the press, it makes very funny sounds and me and my bro used to laugh for thatBlushing.
vathal recipe
Also we like to eat that koozh, though my mom warns us, it will not be good to our tummy. Also the burt bottom, if any, will be really tasty. We will be assigned job to save the vadams from crows. We keep all possible things to keep the crows away, like umbrella sorts of things. But still the crows will be clever enough to sneak and steal the hard work. So we will be shooing away those. Also not to forget to eat the half dried vadams, yummDrooling.  As kids, we also love to peel/ take out the vadams after its gets dried for a day. We never know how difficult and tiring it is for mom with all those daily house chores and still with all interest and doing these things. Amazing right? I always wonder how they have this spirit everyday.
After I saw a dry sunny weather, I decided to make vadams in a small portion and give it a try. I had good sun shining in my balcony in afternoons, so I made use of that and half I relied in fan. I also make use of the hot refrigerator top too. Yeah, weird, but it worked like a charm. I don’t know how many will be able to find time, space and sun to try making vadams to make use of this post, but sure it will help me in my future to refer.

Koozh Vadam/ Vathal Recipe

Recipe Cuisine:Indian  |  Recipe Category:Snacks/ Sides
Prep Time: 12 hrs    |  Cook time: 15 mins    Makes: 3 cups

Ingredients


Raw rice 1 cup 
Sago/ Javvarisi 1 tblsp 
Green chilli 3 
Jeera 1 & 1/2 tsp 
Salt as needed 

Method

  1. Soak rice and sago together overnight, grind into very smooth paste with little water, chilli and salt. I ground in mixie itself. If you make in bulk, grind using wet grinder.
  2. 1-soak
  3. Boil 3 cups of water in a heavy bottomed vessel. I used my pot shaped cooker. Add jeera to it.Add the ground rice to it with constant stirring. Cook in medium flame constantly stirring with a spatula until it gets cooked, thick and colour is changed as shown in the picture. 2-boil3-cook
  4. Wet your hands and if you take some dough, it will be shiny and not so sticky. Choose a plate with your choice of shape. I choose a flat one, so that it will be easy to dry. You can use the ribbon pakoda plate or star shape or clove shaped hole plate.Spread a clean white cloth and sprinkle some water. Fill the press with the prepared koozh. Squeeze into straight lines (more or less) and repeat the process to finish the koozh. 4-cooked5-process
  5. Squeeze into straight lines close to each other as shown in the picture. Dry in sun.In the night put under fan wind to dry. You will be able to peel the next day morning. Peel and dry it in sun. 6-squeeze7-dry
  6. After you peel keep the semi dried part facing up. Sun dry for 5 days or until crisp dry. Fry and test in oil one or two. If its full crisp then its done, if its chewy in the mid and sticks to your teeth, then its not dried. Dry for few more days in hot sun.Once dried, transfer to the container to store and fry when needed in oil. Oil should be enough deep fry and hot enough.Drain in paper towel and serve with your favorite variety rice. 8-fry9-drain

Notes

    • I realized I made bit broader with the chosen plate, a ribbon pakoda press will be perfect I think.
    • Some make with a ratio of raw rice and par boiled rice too. But gives a bit red colour when fried. But its tastier than raw rice vathals.
    • Adding small amount of sago gives nice texture and makes light when fried.
    • If you grind coarsely instead of smooth, vathal when fried will be crunchy instead of crispy.
    • Sun should be really hot atleast the day you are making. After that whole day of drying you can manage it to dry in fan.
    • Keep a bowl full of water while squeezing to ease the sticky feel you get through in your hands during the process.
    • It takes only 2 days, to dry completely, provided perfect full day hot sun, if you make it using the flat hole press.
    • The koozh should be loose enough to press through easily. So not make the koozh to get cooked for long time and make it thick. Switch off the flame as soon as the colour changes and becomes thick enough to press through.
    • If its watery, then the dried vadam will be split into tiny pieces and wont come out long.
    • If not dried properly, fungus may develop, so make sure you have enough sun.
    • If after you dry 3/4th but only a bit chewy in the middle when fried, unfortunately no sun also, then you can preheat oven for 190 deg C and spread the vadams. Let it be inside the hot oven for 15 minutes and cool down before storing. (Do not bake it, just spread in hot oven).
    • You have to store after you dry the vadams in hot sun, not after being out overnight.

I had with coriander rice, but goes well with and is handy when you make variety rice like tomato rice, lemon rice, tamarind rice…
 koozh-vadam

JIGARTHANDA RECIPE | JIL JIL JIGARTHANDA | SUMMER SPECIAL

$
0
0
jigarthanda recipe

I have to first admit that I have never tasted jigarthanda before, though I really wanted to. I every time stare at the Jigarthanda picture in Murugan Idli shop, but never tried it. I will surely try soon as I want to try it in a restaurant too. After I tried few days back, I am really liking its rich taste. I have never tried falooda too, some people say this is also tastes similar to that. Since I am a great great fan of nanaari sarbath, I always buy and stock the sharbat bottle and have it now and then with lemon squeezed to it. I really love it. I have never liked the flavor as a kid, but now totally changed. I love to have it chilled with loads of ice cubes, a pinch of salt and lemon squeezed to it. Thats nannari shebat I have usually. I always wondered if we could use this syrup in any other ways. But had no idea until I saw the recipe in CFG. I referredPavithra’s blog too for the basic idea. I enjoyed this drink to the core, I am sure this will be your favorite too if you try. Its body coolant too with the nanaari syrup and the agar agar. I  know there are lots of variations in the recipe, but here’s mine.
Jil jil jigarthanda

Jigarthanda recipe

Recipe Cuisine:Indian  |  Recipe Category:Drinks
Prep Time: 30 mins    |  Cook time: 30 mins    Serves: 2

Ingredients


Milk 3 cup 
Nannari sharbat syrup (Sarasaparilla root syrup) 4 tblsp 
Agar agar/ China grass 1/2 tsp 
Ice cream 2 scoops 
Tutti frutti (optional) 1 tblsp 

Method

  1. Boil milk and reduce it to 1 & 1/2 cups, that is boil until the volume is reduced to half. Cool down and keep refrigerated until use.
  2. 1-boil-milk
  3. Heat water until its warm and add china grass to it, dissolve it completely. Mix well and cool down, keep in fridge for 30 mins. (Or prepare jelly as per the package instructions)
  4. 2-prepare-jelly
  5. At the time of serving, take out the set jelly and in the serving glasses, add 2 tablespoon of the jelly.
  6. 3-place
  7. Add nannari syrup in each glass, followed by the chilled thick milk.
  8. 4-syrup
  9. Lastly scoop ice cream to each on top. Garnish with tutti frutti if you like it.
  10. 5-scoop

Notes

    • You can use any colour of china grass, I preferred white, but mine is flavored. Vanilla flavored.
    • You can replace nannari syrup with rose flavored syrup too.
    • You can replace agar agar with badam pisin.
    • Any rich ice cream that can go with this can be used.

Mix and drink the Jil Jil Jigarthanda. Yummy, rich drink that cools your soul too!

jigarthanda-recipe-1

STUFFED IDIYAPPAM - BREAKFAST MENU 7

$
0
0

Stuffed idiyappam is one of the idea I learnt from my MIL. I have posted my stuffed idiyappam recipe a long while back. But today I thought I will stuff with a difference and did a sweet stuffed idiyappam and a potato stuffed idiyappam. It turned out to be very delicious. I just gulped those just like we do pani puriBig Grin. It was great as such, but if you want you can make sweet coconut milk for the sweet stuffed idiyappam and or a coconut based chutney for the spicy idiyappam. You can also make any coconut based kurma. Please scroll down to the bottom of the post for the side dish ideas and links. Make this for your family and make your weekend special Winking.


Stuffed idiyappam Breakfast

Recipe Cuisine:Indian  |  Recipe Category:Breakfast
Prep Time: 15 mins    |  Cook time: 30 mins    Serves: 3

  1. Pressure cook 2 potatoes, mean while chop veggies and onion – one for potato one for vegetable stuffing.
  2. Once potatoes are done, finish preparing the stuffings-  refer my samosa post for the stuffing recipe. I used similar one or you can prepare your own.
  3. Grate coconut and mix with sugar,elachi, keep it ready as for the sweet stuffing. Let coconut be more and sweet just enough for it. If sugar is more then it may become watery while steaming.
  4. Once the stuffing are ready, prepare the dough. You can make one variety by one and keep it arranged in a plate or hot pack and serve your family once done.
  5. Do not keep your stuffing by pressing it over the base idiyappam, just keep gently as such. Also after finishing making idiyappams, do not keep one over other as it will affect the soft texture.
  6. I used 3/4 cup of idiyappam flour for serving my family of 3. It gave 15 small sized stuffed idiyappams.


Easy yet a special breakfast for your family is ready! Here are the sweet coconut+ sugar stuffed idiyappam, potato masala stuffed idiyappam, mixed vegetable stuffed idiyappam.

Check out the recipes
  1. Stuffed idiyappam recipe
Side dish ideas
  1. Peanut chutney recipe
  2. Coconut chutney recipe
  3. Tomato kurma recipe
  4. Mix vegetable kurma recipe
Check out the other idiyappam variety posts in my blog
  1. Moong dal idiyappam
  2. Tamarind idiyappam
  3. Pepper jeera idiyappam
  4. Tomato sevai
Have a great weekendHappy!!

ELAI VADAM | ELAI VADAM RECIPE | SUMMER SPECIALS

$
0
0
elai-vadam      
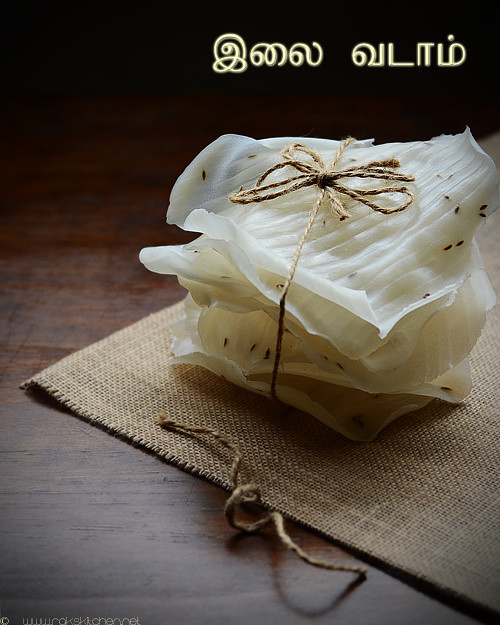
Elai vadam is one I tasted few times as amma makes, but the time when I realized its taste and worthiness is after my delivery. My mom made it and toast directly over fire and give me along the pathiya saapadu. It will be so light and crisp inspite it is toasted dry over fire. My mom and MIL both makes this but in their own ways. I am posting my MIL’s way as I learnt from her. My mom makes this elai vadam by dipping the back of poovarasam ilai (I think, if I am not wrong). She dries for very short time and then drop the leaves in batches in boiling water. Then peel it off and dry. This gives very very very thin, light crispy vadams that melt in your mouth as you bite. My MIL’s version is different but equally gives a crisp vadams, but slightly thicker.
how-to-make-elai-vadam
I am a big fan of the appalam they sell in the exhibitions, but very rarely get a chance to go and eat as I am here Crying. I remember I ate some 4 years back at Chennai exhibition lastly. So this vadam tastes very close to that and that’s why I am loving this so muchLove Struck. This vadam is so versatile. No sun to dry vadam that you plan to make at home?  No worries, you can dry this in shade. Takes less time to dry too. You are not comfortable to fry in oil?  No worries, you can microwave this too. Cool right? Actually there are elai vadam stands commercially available in stores. But I made use of my idli pot to steam these. If you want, you can buy it, it should be available in saravana stores or rathna stores I guess. Otherwise you can follow this method. I thank my mami (MIL) when ever I fry this and eat thisBig Grin. It looks like a lot of work, but its not, you will enjoy doing this I am sure, so make it atleast with one cup rice if not 2 cups.exhibition-style-appalam

Elai Vadam Recipe

Recipe Cuisine:Indian  |  Recipe Category:Snacks/ Sides
Prep Time: 3 hrs  + Drying time  |  Cook time: 1 Hr  + frying time   Makes: 30

Ingredients


Raw rice 2 cups 
Jeera 2 tsp 
Salt  As needed 

Method

  1. Soak rice for atleast 3 hours. Grind with salt to a very very fine paste/ batter. I ground using my mixie. Grinding smooth is important for crisp texture. Add less water while grinding, then if needed  you can add more water to adjust consistency. It should be slightly runny than our usual dosa batter. Mix jeera.1-grind 
  2. Take 3-4 banana leaf and cut into squares so that it can fit your vessel you are going to steam. I used my idli pot, placed a idli plate(lower plate) and kept the idiyappam mesh steamer. Clean the banana leaf, grease very slightly with oil and pour as we do dosa. This should be thin as much as possible. If thick, adjust water consistency. Steam for a minute, while you do in other banana leaves. Takes just a minute. The colour will change as shown in the picture. Using tong we use to fry papad, take the leaf and peel it, while you steam the next. Repeat the process until you finish all the batter.2-steam 
  3. As you peel, you can arrange in a clean white cloth for drying. Do not let it fold while you peel as it will stick. Dry in sun or shade or in fan wind. The next day it will be fully dried. But dry for 3 days for safer side. If you have sun, dry in sun.3-dry 
  4. Store in container immediately after drying – don’t keep overnight outside. Once dried completely, fry in enough oil and drain in paper towel.4-fry

Notes

    • Do not grease with more oil as you cant make round shapes. Do with less oil.
    • No need to grease every time, just 3-4 times once.
    • You can use vadhaam tree leaf which is also large enough to steam these vadam.
    • If you grind the batter coarse, then it will come out hard crisp.
    • If you make vadams thick, then it will not dry easily, you may need sun for drying.
    • In case you add more water and make the batter too runny, keep aside for an hour, drain the water that comes over the top and then try making.
    • If you don’t have idli pot as I have (using cloth) you can use a big kadai with lid too for steaming.
    • If not dried properly then you can try preheating oven for 190 deg. C and spread the vadams inside and leave it as such for 1/2 hour or an hour. Then store it.
    • You can microwave in high for a minute too instead of deep frying in oil.
    • Do not make too big, I made big, but I have to break it before frying. Otherwise it gets fried and enlarges big. So its up to you if you can stand and make, make small or make big and break before frying.

Goes well with any rice varieties, I had mine with tamarind rice. Also as such with spicy podi sprinkled overDrooling
elai-vadam-recipe

BEETROOT PULAO RECIPE (BEETROOT PULAV) | BEETROOT RECIPES

$
0
0
beetroot-puloa-1 
This beetroot pulao is suggested by a reader (Aby Senthil) when I posted Channa pulao. She mailed immediately saying we can try beetroot pulao same way as my channa pulao. And sent the recipe too. So one day I tried and turned out great. Aj loved it. Me too loved it. Once when we went to our mama’s house my mami had made biryani with beetroot. Usually we don’t add beets in Biryani, so it was quite different, attractive and tasty too. But never tried on my own. This is the first time I made and will make it often for ourselves. Do try it for a change, your kid would love it for its colourGirlBoy.
beetroot-pulao

Beetroot pulao recipe

Recipe Cuisine:Indian  |  Recipe Category:Lunch
Prep Time: 30 mins    |  Cook time: 25 mins    Serves: 3

Ingredients


Basmati rice 1 cup heaped 
Beetroot, chopped 1 cup 
Green peas 1/2 cup 
Onion 1 
Ginger garlic paste 1 tsp 
Red chilli powder 1 tsp 
Coriander seeds powder 1 tsp 
Turmeric  1/8 tsp 
Coconut milk, thin 1 cup 
Coriander leaves, chopped 2 tblsp 
Salt  As needed 

To temper

Oil / Ghee2 tsp
Cinnamon1 piece
Cardamom1
Clove1
Saunf (fennel seeds)1/2 tsp

Method

  1. Soak basmati rice for atleast 1/2 hour. Heat a small pressure cooker with oil/ ghee, temper with the items given under ‘To temper’ table in order. Add thinly sliced onions and fry till transparent. 1-temper
  2. Add ginger garlic paste and fry for a minute in medium flame. Add beetroot and green peas. Add little salt and continue frying for 2 mins in medium flame. 2-fry
  3. Add turmeric, chilli powder and dhaniya powder and give it a fry. Add thin coconut milk and a cup of water. Bring to boil, add required salt and soaked basmati rice. Mix well.3-cook 
  4. Cook for 14 minutes in lowest possible flame with lid and pressure valve. Or upto 2 whittles in medium flame. Garnish with coriander leaves.5-ready

Notes

    • You can garnish with fried cashews too.
    • You can skip green peas.
    • I didn’t had ginger garlic paste, so I pressed ginger and garlic in garlic press.

Serve hot with any raita, onion raita best or boondi raita and chips.

beetroot-pulao-recipe

MASALA MOR RECIPE (MASALA NEER MOR)

$
0
0
masala-mor  
I have been thinking to try this for more than 2 weeks now since my friend Sangeeta told the recipe. I thought it would be a chaas recipe until the day before I tried. But she said it is pukka mor recipe and even suggested to present with ‘Sombu’ here in the pictures. I was first sceptical to try this as it had both ginger and garlic in this recipe. So I double confirmed her if it will be stinky. But she told you wont even know that there is both ginger and garlic in this and as she said, when I made and had, it was so so delicious and awesome. Its very simple, perfect for this summer and you can make use of the last too sour curd you have if any. Otherwise you can make it with fresh curd too. I am sure this will be fresh for you, different from neer mor andmasala chaas. Impress everyone with this masala mor this summer!!Cool

masala-mor-recipe

Masala mor recipe

Recipe Cuisine:Indian  |  Recipe Category:Drink
Prep Time: 10 mins    |  Cook time: 0 mins    Serves: 4

Ingredients

Curd/ Plain yogurt1/2 cup
Mint leaves8
Coriander leaves2 sprigs
Garlic1 flake
GingerSmall piece same as garlic size
Green chilli1
Water & Salt As needed

Method

  1. Clean the ingredients needed and grind it with curd and little water, salt using a blender.1-grind
  2. Filter it and add more water to make it thin consistency and adjust salt as needed.2-filter

Notes

    • Do not add more leaves or ginger garlic as it will over power.
    • You can add 1/4 tsp of jeera or ajwain/ oman to this while grinding. Not more than 1/4 tsp but.
    • The consistency is purely your choice, so add water and salt accordingly.

Keep refrigerated and serve chilled when ever needed. And Beat the Heat this summerCool.

masala-mor-recipe

IDLI, DOSA, KADAPPA, CHUTNEY, PODI - BREAKFAST MENU 8

$
0
0
Idli dosa kadappa

I have told enough about my kadappa story in my Kumbakonam Kadappa recipe. Though I like it very much these days, I make very rarely as Aj is not liking the combination. But Vj told its his favorite this time. So I should make it often. I planned to bring my kadappa recipe to limelight so made this weekend special breakfast. I had to make chutney for Aj, I made onion tomato chutney as that is his favorite among the chutneys. I love kadappa with idli sure, but with dosa the bestHappy. I tried making dosa with a flat bottomed small bowl as they do in restaurants. What’s the big deal? Yeah I always love to watch the making of dosa at restaurants. Of course through youtube I enjoy watching it. I tried using dabara few times but it keeps sticking and end up in dosa with torn spots. I think it comes better with practise. Also our dosa pan is small that our hands are not free while spreading as they do. We do it slow and by that time the batter gets cooked and get stuck to the bowl. Still I tried today and I should say it came out good. I like this mainly because of the even browning. When we use ladle we get concentric circles that gets browned and gives a different look. I love that looks, no problem, but I wanted even browned dosa too as we get in restaurants. So tried this and found better browning, I am sure I will improve if I make often. Lets move on to the planning and making part.

Breakfast with Idli, dosa, Kadappa, Chutney, Podi

Recipe Cuisine:Indian  |  Recipe Category:Breakfast
Prep Time: 12 hr     |  Cook time: 45 mins    Serves: 4

  1. Have to plan the  before day and grind idli dosa batter. I soak by 3 in summer days and grind after 6, keep overnight for fermentation. Next day use as required.
  2. After coffee works, pressure cook potato and moong dal for kadappa. If you want to make it quick, then you can start cutting works side by side. But I like to relax a bit after coffee workBig Grin.
  3. Once potato and dal are done, keep potatoes for cooling and proceed to the cutting works. Onion for chutney and kadappa, tomato for chutney and kadappa.
  4. Grate coconut as needed for chutney and kadappa, as usual, I had grated coconut forzen so used that. Keep all other ingredients ready like green chillies, coriander leaves, curry leaves, red chilli, channa dal etc.
  5. First roast for chutney, then temper for it in a bowl, next temper and fry onions with tomato if using for kadappa. Transfer to another vessel and boil for kadappa.
  6. Fry onion and tomato for chutney and cool it down. Grind chutney, keep aside.
  7. Grind for kadappa and finish preparing kadappa, while it boils you can make idlies too.
  8. Lastly when you are ready for breakfast, make hot dosas if needed and serve.
Breakfast with Idli, dosa, kadappa, onion tomato chutney, idli podi– ready! Here is a snap with only idlis.
Idli kadappa

Check out the recipes
  1. Video to make crispy roast dosa
  2. How to make idli & dosa
  3. Onion tomato chutney recipe
  4. Kadappa recipe
  5. Idli podi recipe
Check out this interesting saravana bhavan style onion tomato gravy and the chutney recipes too.
Happy Cooking Happy!!

SHORTBREAD COOKIES RECIPE | EASY COOKIE RECIPES

$
0
0
shortbread-cookies-recipe
I have tried baking shortbread cookies when I started experimenting baking. But it didn’t turn out good. It did, but due to my confusion I over baked the cookies and spoiled it. Then after that I had no heart to try as it has lots of butter. Now I got confidence to try again and tried last week as Aj wanted something for snack and he wanted me to bake some cookies. Mainly he wanted to enter kitchen helping me, so since its holidays for him I thought let me involve him to keep him engaged. So I referred Martha Stewarts recipe and tried this time. It came out good and even Vj loved it. So why not bake these cookies and pack your kids snack box with homemade butter cookies?Smug
shortbread-cookies

Shortbread cookies recipe

Recipe Cuisine:Continental  |  Recipe Category:Snack
Prep Time: 1 hr 30mins    |  Cook time: 15 mins    Makes: 30 


Ingredients

All purpose flour/ Maida 1 cup 
Powdered sugar  1/4 cup 
Unsalted butter 1/2 cup 
Salt 1/4 tsp 
Vanilla essence  1/2 tsp 


Method

  1. Bring butter to room temperature to soften it. Do not melt. beat with a whisk until fluffy (3 minutes). I used my hand blender with whisk attachment but you can use you hands. Make sure you beat well. Add powdered sugar, vanilla and again beat fluffy.
  2. 1-beat
  3. Mix flour and salt well and add it to the beaten butter sugar mixture. Make dough. If your dough is too sticky and doesn’t hold a shape, add 1 or 2 more tblps of flour until you are able to form a soft non-sticky dough. Mine turned gooey, so I had to add few more tblsp of flour. Nothing went wrong, so you can do that if needed.
  4. 2-fold
  5. Flatten to disc and wrap with a cling wrap. Keep refrigerated for atleast an hour.
  6. 3-dough
  7. Line baking tray with baking sheets. Roll out the dough using rolling pin for 1/4 inch thickness. (You can use a butter paper over the dough to avoid sticking to the rolling pin, just in case).
  8. 4-fridge
  9. Using your favorite shape of cookie cutter, cut out the cookies. Take out the other parts of the dough leaving the cut cookie in its place without disturbing its shape. Re-roll the scraps again and cut out cookies. Use a spatula to take out the cookies.
  10. 5-cut
  11. Arrange carefully in the baking tray. Refrigerate it for 30 minutes before baking. Preheat oven for 160 deg C (or 325 F). Bake for 15- 18 minutes until the sides of the cookies just start to change colour. Cool over wire rack completely before baking.
  12. 6-bake

Notes

    • Refrigerating the dough is very important, give enough time.
    • After cutting out the shapes in the rolled out dough, take out the side row by row for easily taking out the cookies.
    • If while re rolling, its difficult for your to handle, refrigerate the dough again. To avoid this, act quickly. Do not knead much with your hands as it will melt the butter and soften the dough.
    • After the sides start changing its colour, the centre part may still be soft, which you need not worry, it will get firm after it gets cooled down completely.
    • Dot over bake as it will affect the taste.
    • My cookie cutter is too tiny so I got more than mentioned.

Tastes and smells divinely, I love especially after 2-3 days Winking

shortbread cookies

SWEET IDIYAPPAM RECIPE (WITH COCONUT AND JAGGERY)

$
0
0
sweet idiyappam
As I have told, we make idiyappam very often for breakfast and the family loves it. Though we make mixed idiyappam varieties than with kurma. And this is very basic idiyappam my mom makes each time along with the savory idiyappams. I love this a lot but I rarely make it. I make with sugar and coconut these days as its instant. But I just love this authentic version mom makes and wanted to the recipe here. This jaggery mix can be made prior and mixed when needed later. So you can save time while making this. Simple yet comforting taste.
jaggery-idiyappam

Sweet idiyappam recipe

Recipe Cuisine:Indian  |  Recipe Category:Breakfast
Prep Time: 10 mins    |  Cook time: 25 mins    Serves: 2

Ingredients


Idiyappam flour/ rice flour 1/2 cup 
Sesame oil 1/2 tsp 
Salt (if not in the idiyappam flour)As needed
Jaggery, powdered 3/4 cup 
Grated coconut 1/2 cup 
Cardamom 1 
Ghee 1 tsp 
Cashew nuts (optional) 5 

Method

  1. Bring enough water to boil, when it starts to boil, pour into the flour, (add salt if needed) along with sesame oil and make dough. Keep covered.1-dough
  2. Make dough smooth when it is warm enough to handle and squeeze through idiyappam press over idiyappam steamer mesh or a greased idli plate. And steam it for 2 minutes.Repeat the process to finish the dough. 3-steam
  3. In a heavy bottomed pan, add powdered jaggery and add water to immerse the jaggery. Bring to boil and stir to dissolve the jaggery completely. 4-boil
  4. Add grated coconut, powdered elachi and mix well and switch off the flame when it becomes thick. 5-syrup
  5. Add this to prepared idiyappam and mix gently to make the idiyappam strands separate. Fry broken cashews in ghee and mix with this if desired. 6-mix

Notes

    • Bring water just to boil and do not boil for long time. If water is too hot, the dough will get over cooked which makes soft idiyappam but very hard to press. If not boiled enough also then the idiyappam will come dry and chewy. So make sure to keep the water in correct temperature.
    • Squeeze the idiyappam quickly before the dough gets cold as it will be difficult later.
    • Choose finest rice flour for soft and moist idiyappams.
    • Add salt only little to enhance the sweetness.
    • You can make the syrup before day and keep refrigerated for next day use.
    • Use the jaggery syrup only as needed. 

Serve for breakfast along with other tiffin items or other savory versions of idiyappam.

sweet-idiyappam-recipe

Check out the other savory idiyappam varieties

  1. Tamarind idiyappam
  2. Lentils idiyappam
  3. Pepper jeera idiyappam
  4. Tomato sevai
  5. Stuffed idiyappam

NARTHANGAI SADAM / CITRON RICE RECIPE

$
0
0
narthangai-sadam-1

Very recently I have started liking Narthangai/ citron. When in-laws came they got few narthangais and I made pachadi. Now again when I got 3 big narthangais through my Karaikudi mami, I made pachadi with 2 and made narthangai sadam with one fruit’s juice. And this is the first time I am making narthangai sadam. Being a mixed rice variety lover, I loved it so so much. Its same as lemon rice. Very easy to make but very flavorful and tasty. If you in case get a chance to lay hands over these fruits, do try rice with it. Though the recipe is too simple, I still wanted to blog this :)

citrion-rice

Narthangai sadam recipe

Recipe Cuisine:Indian  |  Recipe Category:Lunch
Prep Time: 5 mins    |  Cook time: 15 mins    Serves: 2

Ingredients


Narthangai juice 1/4 cup 
Cooked rice  3 cups 
Turmeric 1/8 tsp 
Salt  As needed 

To temper

Oil1 tblsp
Mustard3/4 tsp
Urad dal 2 tsp
Channa dal1 tblsp
Red chilli 2
Asafoetida Generous pinch
Curry leaves1 sprig
Green chilli4, slit

Method

  1. Add a tsp of sesame oil, little salt to the cooked rice and separate the grains. Squeeze the citrion gently to get its juice.
  2. 1-squeeze
  3. In a pan, add oil, temper with the items given under ‘To temper table’. Add turmeric, salt and the squeezed juice and switch off the flame.
  4. 2-temper
  5. Add it to the rice and mix well and keep aside for 30 mins before serving.
  6. 3-mix

Notes

    • Do not squeeze citron too much as it will give bitterness.
    • You can use orange squeezer to squeeze. Also do not press too hard.

Serve it with your favorite vegetable side dish and some fried vadams. I can it as such ;)

narthangai-sadam

PHULKA PANEER BHURJI ALOO BHINDI RICE LUNCH MENU 32

$
0
0
paneer-bhurji-phulka Indian food
After few breakfast menu, I wanted to post lunch menu too, so I clicked this meal I made yesterday. I was feeling like having something with paneer so decided to make paneer bhurji and phulka for lunch. But both Aj and Vj are not big fan of paneer bhurji. So made a side dish with the veggies I had in my fridge that both of them eat. I made this one, it is very similar to dal. I had many fresh fruits and wanted to make a fruit salad, but then I just kept strawberries as it was about to get spoilt. I finished clicking and had a hearty meal immediately Love Struck. This menu is very easy, even bachelors can try this.

Lunch menu 33

Recipe Cuisine:Indian  |  Recipe Category:Lunch
Prep Time: 20 mins    |  Cook time: 45 mins    Serves: 3
  1. Pressure cook dal and rice first. Mean while which you can prepare atta for phulka and keep aside.
  2. Chop one onion each for dal, aloo bhindi, paneer bhurji. Tomato for dal and paneer bhurji (I added tomato and skipped lemon juice in my paneer bhurji recipe)
  3. Capsicum, green chilli, coriander leaves etc ; keep it ready and keep paneer immersed in hot water.
  4. By now dal would have been done and prepare dal first. Then prepare aloo bhindi.
  5. Next is paneer bhurji and make sweet lassi*, keep refigerated.
  6. Lastly if you want any, cut some fruits and before eating, make hot phulkas, Papad.

*For sweet lassi, using whipper blade attachment in tall jar of you mixie, whip thick fresh not sour curd, sugar, elachi and 2 drops of rose essence. You can add malai if you want to make it rich.
Here is the lunch menu with Phulka, paneer bhurji, rice, dal, pickle, papad,fresh strawberries and sweet chilled Lassi.
dal-rice-aloo-bhindi

Check out the recipes
  1. How to make phulka
  2. Paneer bhurji recipe
  3. Dal fry recipe
  4. Aloo bhindi fry recipe
Enjoy your weekend Happy !

DAL BATI RECIPE / DAL BAATI

$
0
0
dal-baati-recipe
I tasted Dal Baati only last year. Weird right?Striaght Face That too I came to know only then. When I was served at a friend’s place. I really loved it and wanted to take the recipe from her. Saw this Dal baati recipe at Khaugri and bookmarked it few month back. But recently wanted to eat this dal baati, so I wanted to try and blog it too. I had this last year when I visited Pune – Rajdhani restaurant. I saw it in a mall and suggested Vj to have lunch there. I have hear about Rajdhani in Chennai that they serve so many varieties of food and dessert. So wanted to give a try there in Pune as I know I wont get a chance to go there at Chennai.

dal-bati-recipe

But there was not that good service where we went at Pune. Or may be we went late for lunch. There were few items missing or they forgot our table. Also we all were South Indians and who ever accompanied us never felt filling and they were waiting and waiting for some rice to be served. But everything was served in small quantity and they never re filled our dishes – as they supposed to do (as far as I know). And I think no one liked the food. Somehow I liked as I like most of the North Indian cuisine. From that time, everyone in our family runs away if they hear the name Rajdhani. But I sure want to visit the one at Chennai once in my life time Winking.

Dal Bati recipe

Recipe Cuisine:Indian  |  Recipe Category:Lunch
Prep Time: 1 hr soaking time    |  Cook time: 45 mins    Makes: 10 baatis

Ingredients

For dal

Toor dal 1/4 cup 
Urad dal 1/4 cup 
Channa dal 1/4 cup 
Tomato  2 
Green chilli  2 
Ginger  1 inch piece 
Garam  masala 1/2 tsp 
Red chilli powder 1 tsp 
Dhaniya powder 1 tsp 
Turmeric  1/4 tsp 
Coriander leaves, chopped 3 tblsp 
Salt  As needed 

To temper

Ghee2 tblsp
Jeera2 tsp
Asafoetida powder1/4 tsp

For Baati

Atta / wheat flour1 cup
Semolina/ sooji2 tblsp
Ghee2 tblsp
Ajwain/ omam1/4 tsp
Baking powder2 pinches
Salt As needed

Method

  1. For making dal, soak dals together for minimum 1 hour. Pressure cook with 2 cups of water for 3-4 whistles in medium flame.1-cookdal
  2. Grind chopped tomatoes, peeled and chopped ginger and green chillies to make a puree.2-grind-tomato
  3. Heat kadai with ghee in medium flame and add jeera, followed by asafoetida. Add turmeric and dhaniya powder in low flame and without burning, give it a stir.3-tadka
  4. Add the ground tomato puree and mix well. Add chilli powder, garam masala powder and salt. Fry for 2 minutes or until ghee floats on top.4-masala
  5. Add cooked dal mashing well and add water to adjust the consistency. Bring to boil, let it boil for 2 minutes or until the desired consistency is reached. Add coriander leaves and switch off the flame.5-add-dal
  6. For baati, in a mixing bowl, mix flour, semolina, salt, ajwain and ghee well. Add water little by little and make a very stiff dough. It should not be smooth and should be having cracks.6-dough
  7. Pre heat oven to 190 deg C. Mean while, divide the dough to 10 equal sized balls and flatten it with a dent in the  middle for easy cooking. These patties should be having cracks, it helps in easy cooking. Arrange in a baking tray.Brush generously with ghee and bake for 10 minutes. After 10 minutes turn the baatis and bake for another 10 minutes or until the baatis turn golden in colour.7-bake
  8. Give some standing time and break it. Just before serving, heat enough ghee in a kadai. Dip the broken baatis in it and serve in a bowl topped with the prepared dal. (I just again brushed with generous ghee.8-serve

Notes

      • Soaking dal helps giving a perfect texture to the dal, so do not skip soaking.
      • This whole dish should be done with ghee, no oil.
      • I skipped deepfrying the baatis and just brushed and topped the broken baatis with ghee. But I highly recommend dipping the baatis in hot ghee before serving for a light and crispy texture.
      • If you make thick baatis, then it won’t get baked inside properly.
      • Make sure to make the dough for baati very stiff. Otherwise the inside of the baatis will be chewy. Water will be needed less than 1/2 cup for 1 cup atta.
      • Adjust dal water quantity so that its thick, yet pourable.

Serve hot ghee dipped baatis with the finger-licking good dal- generously - generous enough to drink it, yummDrooling.
dal-baati

OATS MURUNGAI KEERAI ADAI RECIPE (OATS ADAI WITH DRUMSTICK LEAVES)

$
0
0
oats-adai-with-murungai-keerai
Last month when I made adai, I wanted to make murungai keerai (Drumstick leaves) adai and bought the keerai too. One day made murungai keerai adai and there was still little more leaves but I could not make kootu or poriyal with it. So I though I will soak all the dals needed for paruppu and made oats murungai keerai adai. Long time ago I postedOats Paniyaram. This is same recipe, except that I added murungai keerai and I did not powder the oats to add it to the adai. Since this has no rice and only oats, its texture is sure softer than the one with rice and I made it with green chillies instead of red chillies so the colour also came different. It is sure healthy, but really tasty adai too. Its worth trying and keeping this in your routine menu. When ever you make adai for your family, you can reserve some dal for yourself and include oats in your diet. Since I made it only for me and it was unplanned too, my clicks are not that well composed. So I have been postponing this post for long time. But that’s fine only the recipe and the idea matters sometimes Big Grin. Check out theoats recipes page for more ideas.
murungai-keerai-adai-with-oats

Oats murungai keerai adai recipe

Recipe Cuisine:Indian  |  Recipe Category:Breakfast
Prep Time: 3 hrs soaking time    |  Cook time: 15 mins    Makes: 6 adais

Ingredients


Oats  1/2 cup 
Drumstick leaves  3/4 cup 
Toor dal 1/4 cup 
Channa dal 1/4 cup 
Urad dal 2 tblsp 
Onion (Optional) 1, finely chopped 
Green or red chillies 4 
Fennel seeds/ saunf 1 tsp 
Ginger 1 inch piece 
Asafoetida 1/8 tsp 
Salt  As needed 

Method

  1. Soak dal together for 3 hours. First grind chilli, fennel and ginger with little water.
  2. 1-grind
  3. Add soaked dal to it and grind coarsely.
  4. 2-soak
  5. Add the rest of the ingredients to the ground dal and mix to make a batter. Use water so that the batter is thick enough to spread over tawa.
  6. 3-mix
  7. Heat tawa and grease with little oil. Spread thick adai with two laddles full of batter. Cook covered and flip the adai to cook for another minute in medium flame.
  8. 4-cook

Notes

    • You can add other dals like masoor dal and moong dal each 1 tblsp to this recipe.
    • Since oats is added in place of rice, the texture will be softer than the regular adai.
    • You can make without drumstick too, in that case you can add curry leaves and coriander leaves.

Serve hot withsambar or a chutney or simply have it with idli podi like me Cool.

oats-murungai-keerai-adai

Viewing all 1220 articles
Browse latest View live